Sample Scrapbook Pages
photos and ideas for using paperbag scrapbooking technique on 12 x 12 layouts
Find sample scrapbook pages using paperbag scrapbooking technique, article archiving, buttons, file folders, fiber, ribbon, stamps, stickers, chipboard letters, finger prints, wire, and paper punching!
More Layouts 2 3 4 5 6 7 8 9 10 11 12 13 14 15 16 17 18 19 20 21 22 23 24 25 26 27 28 29 30 31 32 33
See how to use stamps on your layouts!
Sample Scrapbook Pages 1
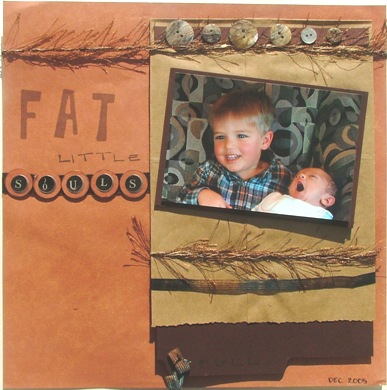
A little background…Fat Little Souls…the
title came from an article by one of my favorite authors, Nancy Wilson.
In her article, she talks about nurturing the souls of your children
and working to make sure that they have “fat little souls.” I have
always been inspired by that article and one day I started thinking
about creating a layout around it. Then I remembered seeing an idea in a
book about using paper bags on 12 x 12 layouts instead of just for
paper bag scrapbooks. And then it hit: why not use the paper bag to hold
a copy of the article? What a great way to preserve what inspires me to
love my children! So, this layout was born. I love looking through my
scrapbooking magazines and books to see sample scrapbook pages. I used a
piece of textured terra cotta colored paper for the background and then
laid the paper bag on top of that. I cut a piece of cardstock to fit
inside the paper bag and used a regular file folder to trace and cut out
a tab for it. Then I stamped the word “pull” on it and attached a
“ribbon v” to it with a regular stapler…still want to get a fastenater,
though.:)
I mounted my photo on acid free cardstock to keep it
from touching the paper bag, added some fibers towards the bottom, and
added a strip of cardstock to the top of the paper bag and used sticky
dots to adhere buttons onto the strip. The word FAT is stamped with
sepia pigment ink and some foam stamps. Under that is the word “little,”
which is also done in the same ink with a different alphabet stamp set.
Then under that is a piece of ribbon. On the ribbon I mounted circles
that I punched with my 7/8” circle punch and inked the edges with my
sepia pigment ink. Then I added alphabet stickers to the circles to form
the word “souls”. Finally, I added the piece of fiber all the way
across the layout to bring the two sides together. And, when I get
around to it, I plan to mount the article that inspired this layout to
the brown cardstock inside the paper bag…real life is great isn’t it? I
hope you enjoyed this first of my sample scrapbook pages!

Sample Scrapbook Pages 2
This layout is started with a
piece of patterned paper for the background – all of the other papers on
the page were made to coordinate. I created the overall look with
different size squares and rectangles of each paper. I inked around the
edges of some. In the bottom right hand corner I used a clear sticker
with the word “wonder” and then I hand lettered the date in a vertical
line to the left of the photo. The title was the best part of this
layout. The T is a chipboard letter that I rubbed on my sepia pigment
inkpad to color it brown. The A is a circle punched out of the green
paper, then stamped with a flower and sepia ink, then inked around the
edge with the same ink, then I added a letter sticker. The Y is made out
of two nested squares inked around the edges with a letter sticker on
top of that. The L is a piece of ribbon with a letter sticker on it. The
O is my favorite. It is just two nested, inked squares, but then I
added my fingerprint in sepia ink. Then I added a letter sticker. The R
is an inked circle punch with another letter sticker. And finally, the S
is another piece of ribbon with a V cut out of the bottom and another
letter sticker on top of that. To the right of the title, I added 3
“ribbon V’s.” The first is attached with a sticky dot and a button to
cover the dot. The second is attached with an eyelet and the 3rd is
attached with a regular staple. Last, I ran my sewing machine along the
top and the bottom without any thread in it just to get the holes
punched in the paper. : ) I hope you enjoyed the second of my sample
scrapbook pages!


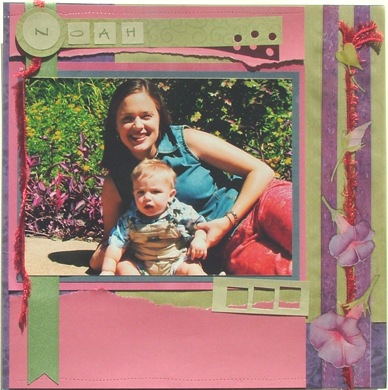
Sample Scrapbook Pages 3
This is one of those that had
been in progress for a year and a half… : ) After browsing though my
scrapbook magazines looking for some new sample scrapbook pages, I
finally got the inspiration. The background is a 12 x 12 piece of purple
textured paper. Then I layered a large green tone-on-tone stripe
rectangle in the upper right hand corner. Next I used a set of stickers
to create the vertical border on the right – the purple strips and
flowers are stickers and the pink strip is a fiber that I laid under the
stickers. Then came the layer with 3 pieces of pink. The top and bottom
pieces are torn and the middle piece of pink paper is the mounting for
my 5x7 photo. Then on the middle piece of pink paper I layered a piece
of dark blue cardstock before adding the photo. The title is a strip of
green tone-on-tone swirl paper with 3 holes punched out with a regular
hole punch. Then I added a piece of green ribbon down the left side and
ran it under the picture and then over the bottom piece of pink torn
paper. Next I added a piece of the same pink fiber from the right border
under the title and over the photo on the left. Then I punched out 2
nested circles for the first letter of the title and 3 little squares
for the next 3 letters. And I used the piece of paper that I punched the
squares out of for the accent right below the photo. Last, I ran my
sewing machine along the top and bottom without thread in it to add some
texture. And eventually, I’ll do the journaling. I hope you like my
sample scrapbook pages.

See More Sample Scrapbook Pages from time to time....


New! Comments
Have your say about what you just read! Leave me a comment in the box below.