Scrapbooking Page Layout Idea
more layouts from my collection
Scrapbooking Page Layout Idea – learn to use pocket techniques, staples, ribbon, fingerprints, stickers and glitter glue to create scrapbooking layouts.
More Layouts 1 2 3 4 5 6 7 8 9 10 11 12 13 14 15 16 17 18 19 20 21 22 23 24 25 26 27 28 29 30 31 32 33
Scrapbooking Page Layout Idea 1
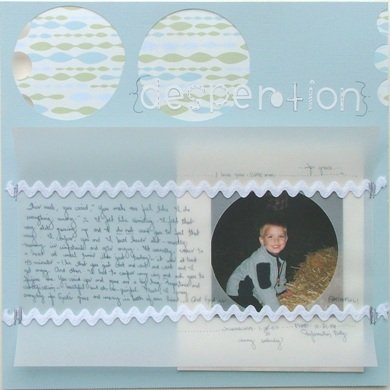
Desperation for God to give me strength to be a good Mom is the theme of this layout. The first piece of paper is the patterned one. I punched the three holes in the top left corner. Next, I cut out the larger circles with my Fiskars circle cutter and punched the three half holes in the top right edge of the paper. Then I used a white paper bag with the top cut off with a patterned scissors. Next came the photo. I then laid the vellum down with the hole already cut in it. I attached the vellum and the rick rack with multiple staples. I then did the title with white stickers and doodled on them. Finally, I did the journaling. The journaling technically doesn't “go” with the photo. It was months after the photo was taken but it captured what I want Noah's face to look like.

Scrapbooking Page Layout Idea 2
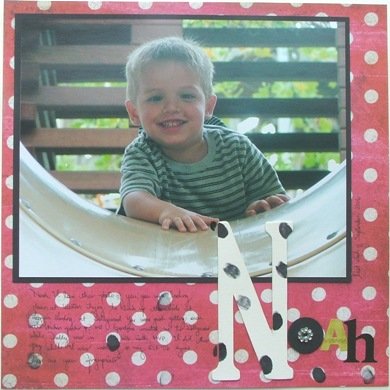
This is just a fun layout I did and it was one of my very easy scrapbook pages. It starts with the polka dot paper (Daisy D's) and then I matted the 8 x 10 photo on black card stock. It is Noah at the top of a slide. I then used the chipboard N, a punched out black circle with a gemstone brad for the O and a sticker for the A and the H. The dots on the N are fingerprints and the dots on the journaling area are fingerprints also. Finally, I added the journaling.

Scrapbooking Page Layout Idea 3
Another layout using file folders. I love this one! It is about my iPod. It gives a snapshot of what I was listening to in August 2006. At that point I wore it most of the time listening to sermons, podcasts, a parenting seminar and many other things. Talk about a sneak peak into the past. So, it starts out with a piece of 12 x 12 brown cardstock. I then attached the green piece with staples on the left and right sides. I then added the photos and the photo corners (stickers) and the title is made out of stickers from the same sticker pad as the photo corners. Next, I attached the red ribbon with staples and smeared glitter glue along it. Finally, I added the tabs from the same sticker pad to the file folder, wrote the When, What, Why and Who about my iPod and put the folder in the pocket. See more pocket techniques!


See another Scrapbooking Page Layout Idea....


New! Comments
Have your say about what you just read! Leave me a comment in the box below.