Scrapbooking Ideas
our first house, wedding and day trip layouts
Scrapbooking Ideas – I've used alphabet stamps, pocket techniques, ribbon tags, staples, eyelets, rounded corners, ribbon and computer printed vellum journaling blocks to create these layouts. I tell you how I did them and where you can see more of my personal scrap layouts.
More Layouts 1 2 3 4 5 6 7 8 9 10 11 12 13 14 15 16 17 18 19 20 21 22 23 24 25 26 27 28 29 30 31 32 33
Wanna see ideas for mini albums?
Scrapbooking Ideas 1
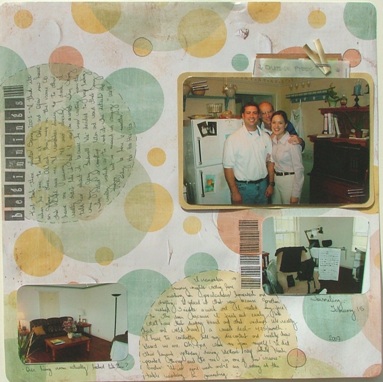
This is all about our first year in our
first house. I only included 3 photos on the layout but I LOVE pocket
techniques for all those other photos I want to include but don't fit in
the design. I created a vellum envelope by stapling two pieces of
vellum together and then matted wallet size photos and placed them in
the envelope and then put the envelope in the pocket I created behind
the 4 x 6 photo. I journaled on the back of the matted wallet size
photos so I get to tell the story but I didn't have to find room on my
12 x 12 layout. Did I mention I love pocket techniques? : ) Oh, I almost
forgot. I stapled a ribbon “tag” to the envelope so it is easier to
see.
I didn't have to do much embellishing for this one because the circle
pattern of the paper created lovely dimension. The journaling fit nicely
inside the large circle. I just doodled around the borders of the
circles to create a bit of definition and added the stamped title
“Beginnings” to the top left journaling circle. The horizontal lines you
see to the left of the bottom wallet size photo are created with stamps
that came with the same alphabet set that I used to do the title.
The polka dot paper is from daisyd's – Robin's Egg Classic Circles - #
11728. I'm not sure who the alphabet stamp set is from because I didn't
keep it in the original packaging.

Scrapbooking Ideas 2
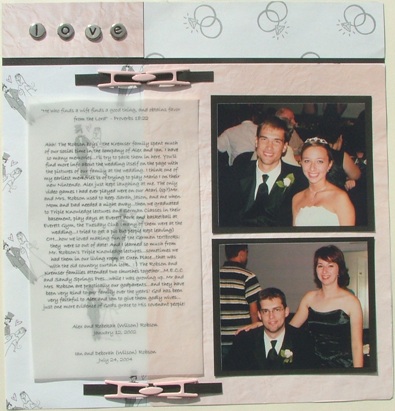
Wedding photos of brothers who married sisters. One of my best friends from growing up (Alex) married a girl named Rebekah and then his brother Ian married Rebekah's sister. The photos are from Ian and Deborah's wedding but I got photos of both couples and made this fun wedding layout. Let's see how I can describe this one? I used 3 different patterned papers – one pink marbled look, one with wedding rings and one with a sketch of a bride and groom. For the bottom ¾ of the layout I laid the pink marbled look on top of the bride and groom and then I place a black strip of card stock behind the top of that. Then to the black card stock I attached the pink marbled paper on the top right and the wedding rings on the top left. I hope that made sense. Sometimes it is hard to explain with just words. Next I used my computer to type out the journaling and then printed it on vellum. I just have an old inkjet and it works great. I just have to let it dry for a bit. I'm not sure what to call the letters that I used to create the title on the top left. They are little metal circles with prongs on the back. You punch them into the paper and then bend them back to hold them in place. Finally, I used the pink embellishments to make it look like the two bottom papers are being held together. I think you are supposed to use ribbon with them but I just cut strips of black paper and wove it through! : )

Scrapbooking Ideas 3
Get more ideas and inspiration each month
in my ezine. Every now and then I miss a month because I am a real
person here and sometimes life gets crazy but I usually get am issue out
to you the middle of each month. You'll find more scrapbooking ideas like the ones
on this page. It just varies from month to month what I focus on.
Come join the fun!
Scrapbooking Ideas 4
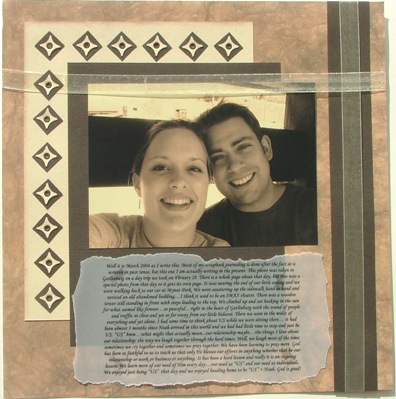
This layout is all about a favorite photo from a favorite day trip/date we took shortly after our first child was born...boy did we need to get away. The background paper is from Karen Foster Design – 60344 – Shabby Brown. I'll start with the bottom layer and work up. Like I said, the bottom is the Karen Foster paper. Then I placed the off white card stock. I smeared the edges with brown chalk and then added the punch out detail. I made those by layering a brown square punch out underneath the off white star shape. I attached them with the brown metallic eyelets. Next, I added the brown card stock behind the 5 x 7 photos. I had the photo printed in Sepia to coordinate with the paper. I then added the vertical brown card stock strip on the right and ran the sheer ribbon on top and criss-crossed the horizontal ribbon with it. The horizontal strip of ribbon is also added in with one of the punches. Finally, I printed my journaling out on vellum and attached it with double sided tape. I need to find a better way to do this. Any suggestions?

Get more scrapbooking ideas from time to time....


New! Comments
Have your say about what you just read! Leave me a comment in the box below.