Free Scrapbook Layout Ideas
Photos and Ideas
Free Scrapbook Layout Ideas – One 12 x 12 and one 2-page
layout. Find out how to use vellum to highlight certain areas of your
photos, attach elements with staples, ink your projects for an antique
look, see a layout with Making Memories Photo Décor 8”chipboard letters
(so cool!), and see how I included a DVD tour of my grandmother’s house
on a 2-page layout.
More Layouts 1 2 3 4 5 6 7 8 9 10 11 12 13 14 15 16 17 18 19 20 21 22 23 24 25 26 27 28 29 30 31 32 33
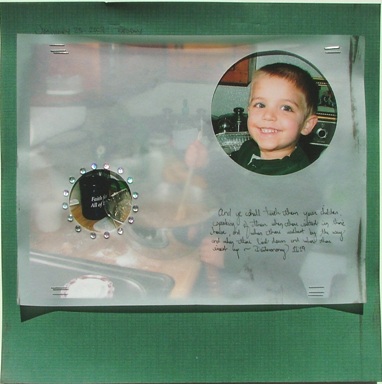
Free Scrapbook Layout Ideas - 1
Here is a very
simple scrapbook layout that was so quick and easy but so great! Why?
Because it is all about real life… The photo (an 8 x 10) is from a
household week where we were doing alot of baking...Noah loves to help
me make stuff; especially homemade bread. I love the way the mug just
happened to show up in the photo: Faith for All of Life...how
appropriate - this is what IT's all about!
I marked on the
vellum what I wanted to highlight on the photo…Noah’s face (loving
helping mommy) and the mug (Faith For All of Life). And that serves as
my title really…the Faith for All of Life part. I stapled the vellum to
the photo and then uses double sided tape to attach both to the
cardstock. Then I glued tiny jewels around the hole in the vellum
highlighting the mug. Finally, I wrote the date above the photo and the
verse (Deuteronomy 11:19). This is what I work towards and pray
for…walking with my kids.
Finally, I inked along the
edges of the cardstock and smeared some along the vellum as well. Just a
note, if you try to ink on vellum, make sure you use Stayz On because a
regular pigment ink pad won’t dry on vellum. (learned that the hard
way) : ) Eventually, when this layout has simmered more in my mind I’ll
write the journaling along the large bottom margin. And that’s the
first of the free scrapbook layout ideas.

Free Scrapbook Layout Ideas - 2
This 2-page family
history layout is really only about 75% done, but I wanted to go ahead
and share it with you anyways. Here’s why this is sooooo cool. See the
grouping on the left side there?…the photo on top of the white square
with the 2 circles on it. The little bumps on the white circle are
bubble letters that spell out DVD Inside. That is actually a holder for a
DVD video tour of my grandmother’s house.
Here’s the background
for this layout: last summer I was at my grandmother’s house for a
visit and I realized while I was there that although I had many photos
of us there through the years I really didn’t have a photo of each
wall/area of the house. Someday, she won’t live there any more and I
want to have a clear/organized record of what everything was
like…memories in my mind fade over time and I want to always be able to
“visit.”
So, while I was there I snapped photos of all the walls
in all the rooms of her house…it turned out to be about 32. They sat on
my computer in a file labeled Nana’s House all this time. Then, the rest
of my family was there for a visit recently and before they left, I
asked my little sister to take my video camera and just walk around the
house and grounds slowly and get footage and add her own commentary. It
is PRICELESS. Not just for Nana’s house but for the sneak peak in to my
little 10-year-old sister’s perspective. So cool!
I also have 32
photos. Because the commentary on the video tour in from my little
sister, I still want my perspective included. There is no way to put 32
photos on a 2-page layout and I really didn’t want to create an entire
mini album – too many projects and not enough time. So, I am going to
use an idea from one of my e-zine layouts. I’ll mount each of the photos
onto cardstock and then write my commentary/memories on the back. Then,
I’ll put all of the cards into a pocket on the back of the layout. I
love pocket techniques!
By the way, the large N on the layout is
Making Memories Photo Décor 8” chipboard letters…I found them at my
local scrapbook store…
And that’s the two free scrapbook layout ideas.


See more free scrapbook layout ideas from time to time...


New! Comments
Have your say about what you just read! Leave me a comment in the box below.