If your email reader translated this issue into text (you can't see photos)
click here
and read back issue February 2013 to see the full version.
Hey, Ya'll,
Hmmm?? What to say? What to say? I haven't done much in the way of actual layouts recently. I've been mostly learning about my camera and doing some journaling in my house album. Oh yeah, and working on my Project Life Inspired album. That's one of the reasons I really like doing this e-zine - it is a deadline/motivator for me to get at least 2 layouts a month done. It doesn't sound like much but I look back over the last 3 years (almost) of doing this, and I am thrilled with the layouts I've done. If I had just given up and said 2 a month was not enough, I wouldn't have any layouts. But instead, I have almost 60+ scrapbook layouts! : ) Be encouraged! You can do the same thing. Just set baby step goals for yourself! And be realistic with the time you do have! : )
What's Semi-New?
Free Scrapbook Stuff
Free Scrapbook Printables
Free Scrapbook Elements
Wanna find something on my site? - I have a search box, yeah!
SEARCH BOX
Ways to keep in touch -
My website!
My Blog!
My YouTube Channel!
My Facebook Page!
Pinterest!
Also, let me know what you’d like to see included in upcoming issues. Send me a line at rachel@free-scrapbooking-ideas-and-videos.com. You might have to go through my contact page at the main site because that address has heavy spam filters on it...I might not get it if you just send it from your email program. : )
For Member’s Only…
When you subscribe to The Real-Life Scrapbooker’s Resource, you get access to all of the back issues. Every issue is filled with exclusive layouts and ideas. You won’t find any of the layouts or card designs anywhere on free-scrapbooking-ideas-and-videos.com so it’s a FREE Member’s Only area. Every month you can count on fresh, free ideas for your scrapbooking! And here’s another thought. Every month, put the new issue in a folder in your email software and when you sit down to scrapbook, you’ll have tons of ideas right at your fingertips.
Subscribe to The Real-Life Scrapbooker’s Resource
12 x 12 with 16 Photos
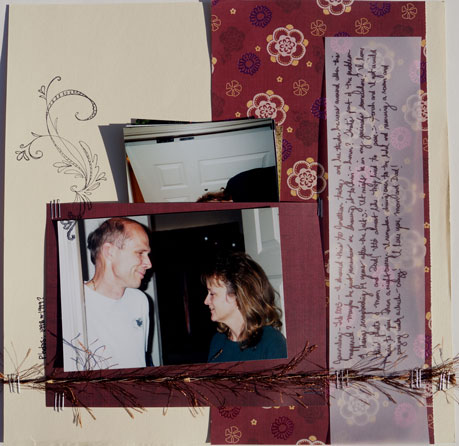
I love using pocket techniques on my scrapbook layouts. It lets me get so many 4 x 6 photos onto 1 page! I get to enjoy some design work and get a creative outlet but I get more photos scrapbooked. For this layout, I used a 12 x 12 piece of cream card stock for the background. Then I used a burgundy patterned floral with iridescent flowers on top of that. Next, I added another piece of patterned paper for the pocket. The main photo went on top of the pocket slightly at an angle. Then I used staples to secure the fiber horizontally across the bottom of the page. I used my black ink pad to stamp the flourish pattern and then slid the clear vellum under the fiber and secured it with more staples. Finally, I did the hand journaling with a fine point Sharpie...works great on the vellum and doesn't smudge!
Supplies:
Background Paper: plain cream colored card stock
Floral patterned paper: Cloud 9 Designs Specialty Paper Pad
Flourish stamps from Inkadinkado Sketchy Flourishes 97632

My 18th Birthday
Wow! I really dug into some old photos for this one! I bounce around all the time with my scrapbooking...I don't do it in chronological order. Recently, I did put together 2 Project Life Inspired albums with the photos arranged my month. I love that but I'm not that inspired/disciplined/organized to do everything in order and "on time". I think it would take the fun and joy out of it for me. There are lots of other things in life that I "have" to do a certain way and be disciplined about. I want to mostly have fun with my scrapbooking, but I do have to be somewhat organized...just don't want to get too obsessive about it. Well...that was a little rabbit trail there! : )
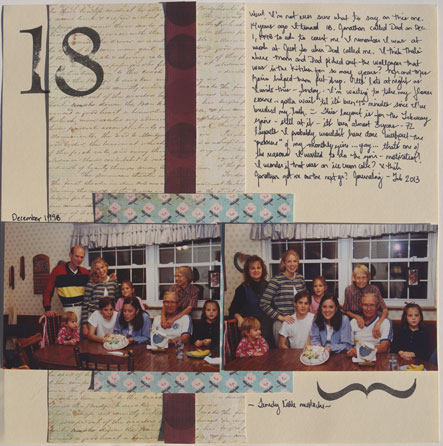
So, this layout is very similar in style to the 1st one. I do that sometimes...just get on a roll with scrapbooking and do it "assembly line style". I used the same 12 x 12 cream card stock for the back ground. Then I used the script patterned paper, the tiny vintage floral and then the tone-on-tone burgundy paper strip. I stamped the number 18 up in the left corner and the little trendy mustache looking motif in the bottom right. It is actually a bracket (I think?) that came on the number stamp cling sheet. Finally, I added the two 4 x 6 photos and the hand journaling with a fine point Sharpie.
Supplies:
Script and tiny vintage floral papers: Mosaic Memories Paper Pack from Recollections (Michael's house brand)
Stamps: Big One Double - number cling stamps from Michael's
Red polka dot tone-on-tone paper: Cloud 9 Designs Specialty Paper Pack

What about next month?
You just never know. We'll see...stay tuned to
Youtube
to find out.
Until sometime around the middle of March
Send Me Your Layouts...
I’d love to see what you’ve been up to. I’ll pick 2 or 3 for each issue and publish them along with your photo (if you want) and a bio about your real life scrapbooking adventures. So, send them to Rachel@free-scrapbooking-ideas-and-videos.com with “e-zine layout submission” in the subject line.
|


