|
If your email reader translated this issue into text (you can't see photos)
click here
and read back issue April 2011 to see the full version.
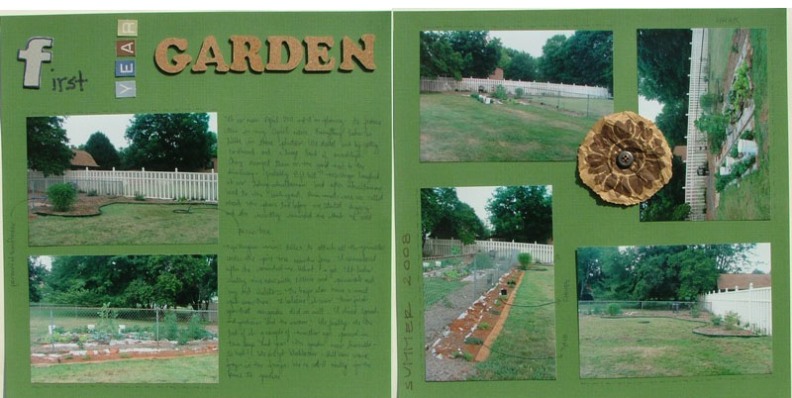
Hey, Ya'll, It is gardening season again! Yeah - but I am so thrilled that I have still been able to spend some time on scrapbooking and I'm actually getting out this ezine on time! : ) In honor of Spring, I'm bringing you a layout all about my "First Year Garden" which was 3 years ago. It has changed so much. It would be fun to do a comparison layout - a "Then and Now" type...maybe sometime. But for now, I have the photos from the first year and the layout turned out really fun.
What's New?
See the new header and SEARCH BOX!
New Scrapbook Card Designs I made some cards this month!!! Yeah! I used my "making-cards-in-series" strategy. What in the world does that mean? Well, it means that when I already have the creative juices flowing from a project, I try to go ahead and make some cards so I'll have them ready when I need them. Works for me! Usually, I make the cards out of the same supplies of the project I've been working on but in this case, I did a "hodge podge/use scraps from the scrap drawer" style. Friends I love using tissue paper in my card and scrapbook projects. I often save it from gifts and sometimes I buy it. For this card, I cut out a rectangle and then crumpled it up and spread it back out. Then I cut out the circle and stamped the "friends" message. It was just a generic foam stamp. I then inked around the outer edge of the circle and the card. Finally, I added the silver accents. They are Faux Eyelets (stickers)from Card Embellishments - you can get them at JoAnns...or at least, that is where I got them but it has been a while.
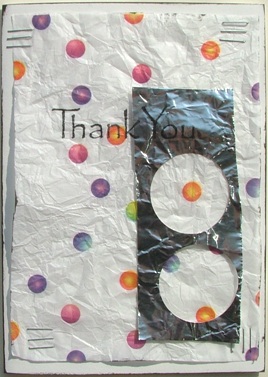
Thank You This is another tissue paper card. The polka dots are tissue paper and I crumpled it and smoothed it back out just like the first card. I attached it to the card with staples. Then I used a piece of aluminum foil and punched out the two circles. I attached that with tape. Finally, I used my Staz On ink to stamp the "Thank You" greeting and then inked around the edge of the card with my black pigment ink stamp pad.
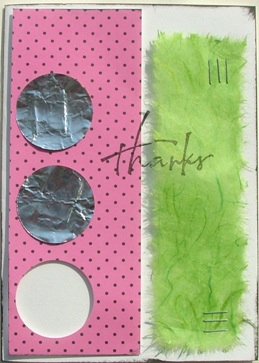
Thanks This card was inspired by a super mini paper bag album that I did a while ago. I love the color combination! I used the pink and black polka dot paper and punched out the bottom circle and then punched out two aluminum foil circles for a total of 3. Groups work well in odd numbers. Then I added the lime green mulberry paper. I love this stuff. You wet the edges and then pull parts of it off to create the feather-like edge. I attached the mulberry paper with staples and then stamped the "thanks" greeting in black and inked around the edge of the card with the black ink pad.
What about next month? I'm not sure yet...I'll probably continue working on the digital scrapbook class over at TwoPeas. Then I also plan to work on my baby mini album. I might add some to my rolodex album? I said that last month as well. You just never know. We'll see...stay tuned to Youtube to find out. Until sometime around the middle of May… Send Me Your Layouts... I’d love to see what you’ve been up to. I’ll pick 2 or 3 for each issue and publish them along with your photo (if you want) and a bio about your real life scrapbooking adventures. So, send them to Rachel@free-scrapbooking-ideas-and-videos.com with “e-zine layout submission” in the subject line. New! CommentsHave your say about what you just read! Leave me a comment in the box below. |